Table of Contents
Making your eeePC work for you
This article was originally published on June 9, 2008.
I just finished up a review of the Asus eeePC 4g (701) for Julie over at The Gadgeteer (check it out here)1). Before i finally got around to writing that review, I hadn’t done a whole lot with my eeePC. Since last night, however, I’ve installed Windows and started looking for ways to make my eeePC as functional as possible.
Install Windows
Now, I do know enough about Linux to do some serious damage. Unfortunately, Linux just doesn’t work for me in the Real World™. As a result, I pulled out my copy of Windows XP SP2, a USB DVD-RW drive I had handy, and got to work.
After about an hour of hair-pulling over the dread “ntldr not found” error, I finally found a forum thread that informed me it was necessary to remove all original partitions on the eee’s minute 4GB of SSD storage. I killed everything – the unknown 8MB partition, the 8MB FAT partition labeled “BIOS”, the 1.5GB restore partition, and the main 2.5GB one. After a quick NTFS format and a voodoo dance, I had Windows XP installed and running. Already my eee is more useful. I can get to the shared directories and drives on my desktop right away, and Asus has thoughtfully provided drivers for everything. These are available on the included DVD, or you can download them here.
Once everything is installed, you’ll have a nice, familiar interface on your eeePC. Now it’s time to get a couple utilities.
Overclock the CPU
For reasons unbeknownst to fans, the eeePC is crippled at the hardware level – the 100MHz FSB is underclocked to about 66MHz, which makes the 900MHz Intel processor run at about 603MHz. A nice guy in Russia wrote a Windows application called eeectl that allows you overclock the CPU to its full 900MHz capacity, as well as enable extra screen brightness and manually control the cooling fan. The eeePC gets warm even at the stock 603MHz, so this fan control is very handy.
Download eeectl
A Better Geek mirror
Make Windows less obtrusive
The default Windows XP Luna theme is rather…chunky. With the help of UXTheme Multi-Patcher, you can use other visual styles. A good place to start is a site like Customize.org, where the themes are tagged and categorized pretty comprehensively. I found a pretty nice theme there, and it’s working out for me so far.
Download UXTheme Multi-Patcher
You can also make make Windows Explorer/My Computer take up a little less space. Right-click on any of the toolbars at the top of an Explorer window, cick “Unlock Toolbars”, and you can drag the bars around. Save even more space by right-clicking and selecting “Customize…”. In this dialog, you can make your toolbar buttons smaller, remove text labels, and remove buttons entirely. Combined with the Explorer Breadcrumbs plugin for Windows, Explorer becomes more useful and less obtrusive.
Download Explorer Breadcrumbs
You can also use the Start Menu options and Microsoft’s TweakUI Powertoy to customize the start menu so that it takes up less vertical space.
Tweak UI
This PowerToy gives you access to system settings that are not exposed in the Windows XP default user interface, including mouse settings, Explorer settings, taskbar settings, and more.
Version 2.10 requires Windows XP Service Pack 1 or Windows Server 2003.
Download Tweak UI
Customize Firefox
Everyone knows that real geeks use Firefox, right? I do, at any rate. With the help of a new theme and a few extensions, you can make Firefox take up as little space as possible.
First off, you’ll want a compact theme like MiniFox. This theme is no longer available since it only works with very old versions of Firefox. A mirror is linked below.
Download MiniFox theme for Firefox
Then, you can use the Tiny Menu extension to condense the menu bar across the top into a single dropdown, while Menu Editor will let you remove unnecessary items from all of Firefox’s menus, including the page and tab context menus. What you’re left with is a much smaller, more compact version of Firefox.
Download Extensions for Firefox
Tiny Menu
Menu Editor
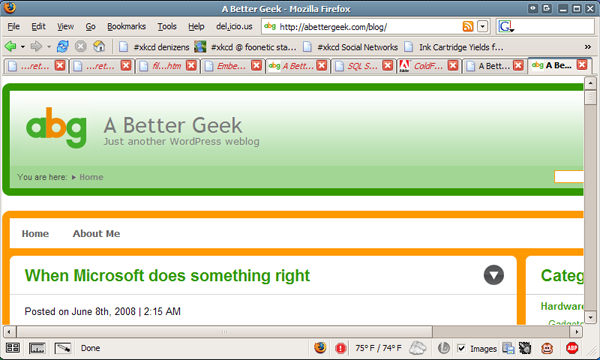
Here’s what Firefox looks like normally for me:
With a few simple tweaks, Firefox looks much better in such a cramped space:
Make use of the Intel graphics accelerator software
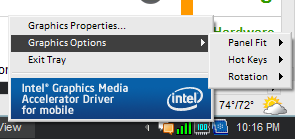
Intel’s drivers for the integrated graphics adapter will put a little icon in your system tray. Right-click on that icon, and select Graphics Options from the context menu.
The Rotation submenu will allow you to rotate the screen to portrait mode. If you have a wireless mouse connected (which I’d highly recommend, and the trackpad can be a little annoying at times), you can hold your eeePC like a book and use portrait mode to deal with oversized dialog boxes. You can even assign global hotkeys to quickly rotate the screen back and forth whenever necessary.
Isn’t that a lot easier to see? The bottom buttons on the Performance Options dialog are below the screen in landscape mode. For what it’s worth, the default hotkeys are Ctrl+Alt+Left to rotate the screen so the taskbar is along the righthand short edge, and Ctrl+Alt+Up to rotate the screen back to normal.
Since making these relatively simple changes to my eeePC, I’ve already found it to be more useful than when it was running the default Xandros Linux interface.
Have fun with your mini laptops!


